CIVIL LEARNERS
  • Home
  • About Us
  • Articles
    • Technical Reasearch
  • Contact Us
  • Home
  • About Us
  • All posts
  • Materials
    • Cement
  • Geotechnical
  • Concrete
  • Quantity Survey
  • Others

Wednesday, 2 May 2018

Basic points to be kept in mind while designing of coloumn

 Er.Ahmad Monis Ansari     May 02, 2018     Concrete, Others     1 comment   

The basic rules for designing of columns are listed below:
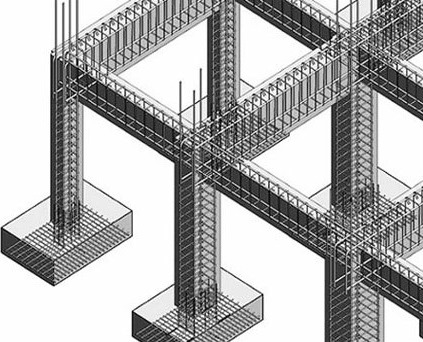
                              Economical Design of Reinforced Concrete Columns
A. LONGITUDINAL STEEL:

1. The cross-sectional area of longitudinal steel in a column shall not be less than 0.8 and not more 
    than 6% of the gross-sectional area of the column.

    In places where bars from a column below have to be lapped with those in the column to be  
    designed, the maximum percentage of steel should not exceed 4%.

2. The diameter of longitudinal bars should not be less than 12 mm and should not be more than 50
   mm.

3. Round columns and columns having helical binders should have at least bars.


4. The minimum cover of concrete to the outside of longitudinal bars shall be 4 cm or the diameter of 
    the bar whichever is greater. In case where the maximum dimension of a column does not exceed 
    20 cm and the diameter of the longitudinal bars does not exceed 12 mm, the cover of 2.5 cm may 
    be used.

5. Where it is necessary to splice the longitudinal bars, the bars shall overlap for a distance of not less
    than 24 times the diameter of the smallest bar.

6. The spacing of bars measured along the periphery of the column shall not exceed 300 mm.

B. TRANSVERSE REINFORCEMENT:

Transverse steel may be provided either in the form of lateral ties or helical bars (spiral).

1. The minimum diameter of the ties or helical reinforcement shall not less than 1/4th the diameter of
    the largest longitudinal bars and in no case less than 5 mm.

2. The maximum diameter of the ties or helical steel should preferably be not more than 12 mm and
    25 mm respectively.


3. The pitch of the ties should not be more than the least of the following

    a) Least lateral dimension of the column.

    b) 16 times the diameter of the smallest longitudinal bar nearest to the compression face of the
         member.

    c) 48 times the diameter of the tie.

4. Pitch of the helical reinforcement should not be more than least of the following:

    a) 1/6th the diameter of the concrete core.


    b) 75mm.

5. The least spacing of the lateral ties may be 150 mm and for spirals, the minimum pitch shall be 25 
    mm or three times the diameter of the helical bars whichever is greater.
Read More
  • Share This:  
  •  Facebook
  •  Twitter
  •  Google+
  •  Stumble
  •  Digg

Wednesday, 25 April 2018

Types of Fixtures and Fastenings for Doors and Windows

 Er.Ahmad Monis Ansari     April 25, 2018     1 comment   

Fixtures and fastenings are provided for doors and windows to provide operating facilities, security for rooms and ease of opening and closing etc. Different types of fixtures and fastenings such as, hinges, bolts, handles, locks are available.

Types of Fixtures and Fastenings for Doors and Windows

Hinges

Hinge is fixture which helps the door to rotate freely along its axis. There are so many types of hinges are there which are as follows.
1. Butt Hinge

This is the most common type of hinge used for doors and windows. It has two flanges made of cast iron or steel. One flange is screwed to the door or window and other one screwed to frame.

                                             
2. Back Flap Hinge

This are similar to butt hinges and used for thin doors. Back flap hinges have wide flanges than butt hinges. They are fixed to the back side of door and frame.


3. Counter Flap Hinge

This hinge has two centers, and these can be folded back to back.

                             
4. Parliamentary Hinge

When the opening is very small or narrow, then it is better to provide parliamentary hinges to provide more space of opening as well as to avoid obstruction while moving furniture etc.

                                  
5. Spring Hinge

Spring hinges are used for swinging doors. The door is closed automatically due to spring action in this case. Spring hinges are available as single acting and double acting spring hinges.


6. Rising Butt Hinge

It is similar to normal butt joint, but it has helical nickel joint in between flanges which helps the door to raise vertically upwards when opened. This is useful for the rooms having carpets etc. the raise may be about 10mm.

                                      
7. Garnet Hinge

It has Tw different shaped hinges. One is of long arm shaped which is fixed to the door and another is of plate shaped which is fixed to the frame. This type of hinge is used for battened or ledged doors.

                                             
8. Strap Hinge

It is also used for battened and ledged doors and windows. It has two long arm shaped flanges.

                                   
9. Pin Hinge

This type of hinge consist two flanges which are joined by pin. If the pin is removed then we can separate the flanges. This is generally used for heavy doors. Two flanges are separately fixed to the door and frame.


10. Nar-Madi Hinge

This is also used for heavy doors, but it consists only one flange which is fixed to the door. Pin is fixed to the frame to which flange is attached whenever is needed.


Bolts


Door or window bolts are used to provide security for the rooms. Different types of bolts are described below.
11. Hook and Eye Type Bolts

This type of bolt is used to keep the windows shutter in required position when it is opened. Hook is fixed to the shutter frame and eye is fixed to the window rail.

                                
12. Flush Bolt

In case of flush bolt the bolt flush is desired to keep with the face of the door.

                                 
13. Aldrop Bolt

Aldrop bolt is olden type and most common type bolt. To lock this bolt pad locks are used.

                                
14. Barrel Bolt
To fix the back faces of doors barrel bolts are used. It contains socket and plate, socket is fixed to the frame and plate is fixed to the back face of door.

                                        
15. Espagnalette Bolt

This is used for highly secured doors and casement windows which cannot be reached easily.

                                  
16. Hasp and Staple Bolt

This is also locked by using pad lock as aldrop bolt. Hasp is fixed to the door or window while staple is fixed to frame.

                                    
17. Handles
Handles are used to open or close the door or windows. There are many types of handles are available. Some of them are Bow type, Lever handle, Door handle, Wardrobe handle Etc.


18. Locks

Locks used for doors and windows are many types and some of them are padlock, mortise lock, rim lock, cupboard lock and lever handle lock etc.

                      
Read More
  • Share This:  
  •  Facebook
  •  Twitter
  •  Google+
  •  Stumble
  •  Digg

Monday, 23 April 2018

CIVIL ENGINEERING LATEST INTERVIEW QUESTIONS AND ANSWERS PART-I

 Er.Ahmad Monis Ansari     April 23, 2018     Others     1 comment   

Q) How do you calculate Bearing capacity of soil?

A) Firstly, it depends on the soil type and type of the project. Calculation of bearing capacity is done either by boring a hole to collect samples of soil or by plate load test.

Q) Explain Bleeding in Concrete

A) The separation of the cement slurry from the concrete mass is called bleeding. It occurs if water is added excess in concrete or poor mixing. In this scenario, the water tries to rise up to the surface of the concrete.


Q) What do you know about tender? Discuss different types of tenders.

A) Tender usually refers to the process whereby governments and financial institutions invite bids for large projects that must be submitted within a finite deadline. The term also refers to the process whereby shareholders submit their shares or securities to a takeover offer.

Types of tenders: 

Open Tendering : Under open tendering the employer advertises his proposed project, and permits as many contractors as are interested to apply for tender documents. Sometimes he calls for a deposit from applicants, the deposit being returned ‘on receipt of a bona fide tender’.
Selective Tendering: Under selective tendering the employer advertises his project and invites contractors to apply to be placed on a selected list of contractors who will be invited to bid for the project. Contractors applying are given a list of information they should supply about themselves in order to ‘pre-qualify’.
Negotiated tenders: These are obtained by the employer inviting a contractor of his choice to submit prices for a project. Usually this is for specialized work or when particular equipment is needed as an extension of existing works, or for further work following a previous contract.

Q) What are IS Code for mix design? (M20, M25 etc)

A) IS 456 : 2000

Q) What are the IS Codes for Prestressed concrete, General construction in Steel, coarse and fine aggregates respectively?

A) IS 383-COARSE AND FINE AGGREGATES
IS 456 -PLAIN AND REINFORCED CONCRETE
IS 800 -GENERAL CONSTRUCTION IN STEEL
IS 1343 - PRESTRESSED CONCRETE

Q) Abbreviate TMT, PPC.

A) TMT: Thermo Mechanically Treated. TMT bars are pre treated thermally and mechanically to bear more loads.
PPC: Portland Pozzolana Cement. To reduce the cement content, flyash is used in this type of cement. It also reduces the heat of hydration.

Q) How to find out the quantity of Steel in Fe415?

A) Dia of bar square/162= wt kg/m.

Q) What is the minimum value of camber provided for thin bituminous surface hill roads?

A) 2.5 Percent

Q) How do you calculate the quantity of concrete?

A) By finding out the volume of concreting area, one can calculate the quantity of concrete required.

Q) Why I-section is preferred to channel section?

A) Its because of MOMENT OF INERTIA. I section has got more moment of inertia than Channel.

Q) How to find the quantity of bricks required for given dimensions of wall?

A) By calculating the total volume of the wall and also the volume of each brick. Then dividing them.

Q) The foundation in which a cantilever beam is provided to join two footings, is known as?

A) Strip footing

Q) Why Shear reinforcement is provided?

A) Shear reinforcement, as name implies, is to provide the resistance against shear forces to which a beam is subjected to and is usully in the form of stirrups which also serve the purpose of holding the main tensile and compression reinf in place. Now the basic doubthere is, although, if the stirrups are provided to resis the shear force, why are these provided parallel to shear force and this way how will they resist shear force.

Thats for two main reasons -
1. shear force does'nt directly acts at stirrups but gets transmitted through tensile and compression reinf, thus
shear stirrups actually bear the shear force as like a tensile bar.
2. the profile of crack developed due to shear force shall not be absolutely vertical (in case of beam) as there are
other forces acting also and because of this the crack shall be always be inclined and if stirrups are there, the
crack profile shall pass through the stirrups and shall be resisted. By: Rohit agarwal

Q) What are the tests performed to check the quality of Portland cement?

A) Tensile strength, Setting time and soundness.

Q) Why PCC (Plain Cement Concrete) is required?

A) PCC is laid on the soil surface to protect the above reinforcement from direct contact with mud/soil. It also helps in levelling.

Q) What is the difference between shear and tension?

A) Shear is the resisting force of a member. Tension is the elongation property of a member when a force act on it.

Q) What is the period of removal of the form work? (Under normal conditions)

A) 7 days for beam soffits
14 days for bottom slabs of spans 4.6 m and more
21 days for bottom beams over 6 m spans
2 days for vertical sides of columns

Q) What materials are added generally to improve workability of concrete?

A) Air-entraining admixtures, Oily or foaming agents.

Q) What is Expansion joint and where it is required?

A) Expansion joints are the gaps which are provided in a structure. Expansion joint is provided to avoid the failure of the structure due to thermal expansion.

Q) What are the minimum covers for different members of a structure like column, beam, footing and slab?

A)
Footing: 50 mm
Column: 40 mm
Beam: 25 mm
Slab: 20 mm


Here is a question for you. What is the difference between Working Stress method and Limit state design method?
Work on this question and subscribe to Civil learner. The answer for this question along with many other questions and Answers will be available soon on Civil learner’s Civil Engineering Interview Q&A Part II
Read More
  • Share This:  
  •  Facebook
  •  Twitter
  •  Google+
  •  Stumble
  •  Digg

Saturday, 24 March 2018

Important AutoCAD Command and Shortcut One Must Know

 Er.Ahmad Monis Ansari     March 24, 2018     Others     1 comment   

In this massive list of approximately 100 AutoCAD commands, I have tried to include some of the most useful commands, Keyboard Shortcuts and Tools which every AutoCAD user must know. Some of the commands in this list are very basic which are used very frequently and also there are commands and tools which are not often used despite their great features.


Basic AutoCAD Commands


This is the list of some of the most basic AutoCAD commands which every AutoCAD user should know. These are some of the Draw and Modify commands which make the very basics of AutoCAD and if you are just starting to learn AutoCAD then you should know all of these basic commands.

L
It can be used for making simple lines in the drawing.
C
It is the command used for making a circle in AutoCAD.
PL
This command can be used to make a Polyline in your drawing.
REC
This command will make a rectangle in AutoCAD.
POL
This command can be used to make a polygon with minimum 3 sides and a maximum of 1024 sides.
ARC
As the name suggests, this command can be used to make an arc in AutoCAD.
ELLIPSE
As the name suggests, this command can be used to make an ellipse with the major and minor axis.
REG
This command can be used to make a region geometry in AutoCAD.
CO
This command is used to copy object(s) in AutoCAD.
ARRAY
Using this command you can make Rectangular, polar or Path array.
TR
This command is used for trimming a geometry.
OP
Using this command you can open options window which contains most of the settings of AutoCAD.
SC
This command is used to change the scale of an object.
B
This command is used for creating a block, the properties of the block can be defined using the block definition window.
I
This command can be used to insert an existing block or a drawing as a block in AutoCAD.
ST
Using this command you can open text style window which controls properties of the default AutoCAD text style.
X
This command can be used to explode objects like Polyline to simple lines, an array or a block to a simple geometry etc.
F
This command can be used to add rounded corners to the sharp edges of the geometry, these round corners are also called fillets.
CHA
This command can be used to add slant edges to the sharp corners, these slant edges are also called chamfers.
LA
This command can be used to open layer properties manage palette which is a tool for creating and managing layers in a drawing.

Keyboard Shortcut Keys

Keyboard shortcuts or hotkeys are the shortest and quickest way of activating some of the common AutoCAD operations or commands. In this list I have included some of the most frequently used and useful keyboard shortcuts.

Ctrl + 0
Clears screen to show only the drawing area and hides palettes and tabs. Press it again to reset default AutoCAD interface.
Ctrl + 1
Select and object and press Ctrl + 1 to open the properties palette which lists properties of the object. You can use this palette to modify most of the properties of the object too. You can also use PR command to open the property palette.
Ctrl + 2
You can use it to open design center palette which contains many AutoCAD blocks that can be used directly in your drawing.
Ctrl + 9
You can use this keyboard shortcut to toggle the visibility of command line. If for some reason your command line is hidden from the drawing area, then use this keyboard shortcut to bring it back.

Ctrl + Shift + V
To paste the copied objects as a block you can use this keyboard shortcut, the block thus created will have a random set of characters as is name. You can use this keyboard shortcut to make blocks quickly without going through the create block window.
Ctrl + Z
This keyboard shortcut can be used to undo last action in your drawing. You can press this shortcut key multiple times to undo many actions.
Ctrl + Y
This keyboard shortcut can be used to redo the last undo action which you have performed.
Ctrl + Tab
You can use this keyboard shortcut to cycle through all open drawing tabs in AutoCAD.

Status Bar Toggle

The status bar is an important feature of AutoCAD user interface and its tools are required quite frequently while making or editing your drawing hence they are available on status bar for easy access. You can activate or deactivate status bar icons using keyboard shortcuts, commands or by clicking on its respective icon.


In this section, I have listed the most frequently used status bar options along with their properties and uses.

F7
This status bar tool will toggle the visibility of background grid which is often visible in your drawing area.
F9
Toggle Snap mode, when snap mode is active AutoCAD cursor will jump to specific points in the drawing area which is defined in snap mode.


DYNMODE
By default the value of this system variable is set to -3 which keeps it off you change this system variable to 3 to make dynamic input active. Dynamic input allows you to add information dynamically on the cursor tooltip.


F8
Toggles Ortho mode on/off. When ortho mode is on you can make lines either horizontally or vertically only.
F10
Toggles Polar tracking on/off. With polar tracking active you can make lines inclined to any angle which is defined in the polar tracking increment angle.
ISODRAFT
Using this toggle you can activate the isometric drawing plane in AutoCAD. You can select from Isoplane Left, Isoplane Top and Isoplane Right. You can also toggle between different isoplanes using F5 function key. The default value of ISODRAFT option is orthographic.
F11
Toggles Object snap tracking on/off. Using this option you can track snap points of geometries like center, midpoint, endpoint etc and make geometries with their reference.
F3
One the most important status bar toggles. This function key activates/deactivates object snap option, when object snap is active you will be able to snap your cursor to some exact points in the geometry like End, center, quadrant, tangent etc. This option allows you to make precise AutoCAD drawings.


LWDISPLAY
This system variable toggles visibility of lineweight in a drawing. The default value of this system variable is OFF which keeps the lineweight display off you can change its value to ON to keep lineweight visible in the drawing area.
TRANSPARENCYDISPLAY
Just like lineweight this status variable allows you to toggle the visibility of transparency of an object. You change the value of this system variable to 1 to make transparency visible or 0 if you want to make it invisible.
SELECTIONCYCLING
Using this system variable you can select overlapping objects very easily. When the value of this system variable is set to 2, an overlapping icon and a menu containing a list of overlapping objects appear and you can select the required object from this list.


If you set the value of this system variable to 1, only the overlap icon appears not the menu. You can turn this off by changing the value of this system variable to 0.


F6
Dynamic UCS can be activated or deactivated using this function key. Using dynamic UCS you can make geometries directly of the face or another 3D object irrespective of the position of UCS. You can also toggle dynamic UCS using UCSDETECT system variable, the values of this system variable can be 1 for ON and 0 for OFF.
GRAPHICSCONFIG


Using this status bar option you can open Graphics configuration window which is used to change settings related to display and graphics properties of AutoCAD. You can also use 3DCONFIG for opening the graphics performance window.
Read More
  • Share This:  
  •  Facebook
  •  Twitter
  •  Google+
  •  Stumble
  •  Digg

Tuesday, 13 March 2018

Bar Bending Schedule for Reinforced Concrete Beam

 Er.Ahmad Monis Ansari     March 13, 2018     Quantity Survey     1 comment   

Bar bending schedule provides the reinforcement calculation for reinforced concrete beam. It provides details of reinforcement cutting length, type of bends and bend length.

We will take one example for reinforcement quantity calculations for a concrete beam.


Bar Bending Schedule for Reinforced Concrete Beam

Example of Beam Reinforcement Calculation:

Consider a beam of clear length of 4m, 300mm wide by 450mm depth. It consists of 2-12 diameter bars at top, and 2-16 diameter and 1 – 12 diameter bars at the bottom. Diameter of stirrup is 8mm spaced at 180mm center to center. Clear cover to reinforcement provided is 40mm.

Fig: RCC Beam Reinforcement Details

Fig: RCC Beam Cross-Section


Now we will calculate the length of reinforcement based on shapes of reinforcement required for reinforced concrete beam in above example.

We will start with bottom reinforcement, B1.

Bar shape of B1 is as shown below:

Length of B1 = clear distance between walls + 2 x width of walls – 2 x bar cover + 2 x bend length

Bend length = 6 x 16 = 96 consider as 100mm

Bend length is calculated as 6 x diameter of bar for reinforcement conforming to IS: 1786-1961

Length of B1 = 4000 + 2 x 230 – 2 x 40 + 2 x100 = 4580mm

Length of bar B2 is calculated based on shape of this bar. This bar bends up near the support as shown below:


Length of bar B2: A + B + C = 4000 + 2 x 230 – 2 x 40 + (1.414xH – H)

H = 450 – 2 x 40 – 2 x 12 – 2 x 12/2 = 334mm

B2 = 4000 + 2 x 230 – 2 x 40 + (1.414×334 – 334) = 4518.3 = 4520mm

Length of Bar T1 = 4000 + 2 x 230 -2 x 40 = 4380mm

Length of Stirrups S1:


Stirrups are spaced at 180mm center to center. Stirrups are provided between walls or support for a beam.
No. of stirrups required for given beam =
  

Length a = 450 – 2 x40 – 8 = 362mm

Length b = 300 – 2 x 40 – 8 = 212mm

Therefore, length of 1 stirrup S1 = 2 x (212 + 362 + 90) = 1328 mm

Where 90mm is the minimum hook length as per IS 2502 – Table – II

Bar Bending Schedule for RCC Beam:

No.
Bar Mark
Bar dia (mm)
No. of bars
Length (mm)
Weight of bars (kg)
Bar Shape
1
B1
16
2
4580
14.5
Bar Bending Shape of RCC Beam
2
B2
12
1
4520
4.02
Bar Bending Shape of RCC Beam
3
T1
12
2
4380
7.80
Bar Bending Shape of RCC Beam
4
S1
8
24
1330
12.6
Bar Bending Shape of RCC Beam
Read More
  • Share This:  
  •  Facebook
  •  Twitter
  •  Google+
  •  Stumble
  •  Digg

Friday, 2 March 2018

High Strength and High Performance Concrete Materials and Difference

 Er.Ahmad Monis Ansari     March 02, 2018     Concrete     No comments   


High Strength Concrete versus High Performance Concrete


High strength concrete and high-performance concrete are not synonymous because strength and performance of concrete are different properties of concrete. High-strength concrete is defined based on its compressive strength at a given age.

During 1970s, any concrete mixtures which showed 40 MPa or more compressive strength at 28 days were designated as high strength concrete. As the time passed, more and more high strength concrete such as 60 – 100 MPa, were developed which were used for the construction of long-span bridges, skyscrapers etc.

While high strength concrete is defined purely on the basis of its compressive strength, Mehta and Aitcin defined the high-performance concrete (HPC) as concrete mixtures possessing high workability, high durability and high ultimate strength.

IS defined high-performance concrete as a concrete meeting special combinations of performance and uniformity requirements that cannot always be achieved routinely using conventional constituents and normal mixing, placing, and curing practice.
Typical Classification of Concrete:
Concrete Types
Concrete Strength
Normal strength concrete
20 – 50 MPa
High Strength Concrete
50 – 100 MPa
Ultra High Strength Concrete
100 – 150 MPa
Special Concrete
> 150 MPa 


High strength of concrete is achieved by reducing porosity, in-homogeneity, and micro-cracks in the hydrated cement paste and the transition zone. Consequently, there is a reduction of the thickness of the interfacial transition zone in high-strength concrete. The densification of the interfacial transition zone allows for efficient load transfer between the cement mortar and the coarse aggregate, contributing to the strength of the concrete. For very high-strength concrete where the matrix is extremely dense, a weak aggregate may become the weak link in concrete strength.

Materials for High Strength Concrete

Cement

Cement composition and fineness play an important role in achieving high strength of concrete. It is also required that the cement is compatible with chemical admixtures to obtain the high-strength. Experience has shown that low-C3A cements generally produce concrete with improved rheology.

Aggregate

Selection of right aggregates plays an important role for the design of high-strength concrete mix. The low-water to cement ratio used in high-strength concrete makes the concrete denser and the aggregate may become the weak link in the development of the mechanical strength. Extreme care is necessary, therefore, in the selection of aggregate to be used in very high-strength concrete.

The particle size distribution of the fine aggregates plays an important role in the high strength concrete. The particle size distribution of fine aggregate that meets the IS specifications is adequate for high-strength concrete mixtures.

IS recommends using fine aggregates with higher fineness modulus (around 3.0). His reasoning is as follows:
  • High-strength concrete mixtures already have large amounts of small particles of cement and pozzolan, therefore fine particles of aggregate will not improve the workability of the mix;
  • The use of coarser fine aggregates requires less water to obtain the same workability; and
  • During the mixing process, the coarser fine aggregates will generate higher shearing stresses that can help prevent flocculation of the cement paste.
  • Guidelines for the selection of materials
  • For the higher target compressive strength of concrete, the maximum size of concrete selected should be small, so that the concrete can become more dense and compact and less void ratio.
  • Up to 70 MPa compressive strength can be produced with a good coarse aggregate of a maximum size ranging from 20 to 28 mm.
  • To produce 100 MPa compressive strength aggregate with a maximum size of 10 to 20 mm should be used.
  • To date, concretes with compressive strengths of over 125 MPa have been produced, with 10 to 14 mm maximum size coarse aggregate.
  • Using supplementary cementitious materials, such as blast-furnace slag, fly ash and natural pozzolans, not only reduces the production cost of concrete, but also addresses the slump loss problem.
  • The optimum substitution level is often determined by the loss in 12- or 24-hour strength that is considered acceptable, given climatic conditions or the minimum strength required.
  • While silica fume is usually not really necessary for compressive strengths under 70 MPa, most concrete mixtures contain it when higher strengths are specified.

Differences between Normal Strength Concrete and High Strength Concrete

  • Micro-cracks are developed in the normal strength concrete when its compressive strength reaches 40% of the strength. The cracks interconnect when the stress reaches 80-90% of the strength.
  • For High Strength Concrete, Iravani and MacGregor reported linearity of the stress-strain diagram at 65 to 70, 75 to 80 and above 85% of the peak load for concrete with compressive strengths of 65, 95, and 105 MPa.
  • The fracture surface in NSC is rough. The fracture develops along the transition zone between the matrix and aggregates. Fewer aggregate particles are broken. The fracture surface in HSC is smooth. The cracks move without discontinuities between the matrix and aggregates.
Read More
  • Share This:  
  •  Facebook
  •  Twitter
  •  Google+
  •  Stumble
  •  Digg

Saturday, 24 February 2018

What Is A Bar Bending Schedule

 Er.Ahmad Monis Ansari     February 24, 2018     Quantity Survey     1 comment   

Bar Bending Schedule or BBS is actually a detailed tabulated worksheet showing the particulars of reinforcing bars as needed in reinforcement drawings of a structure. The phrase “Bar Bending” is so because at the steel yard where different types of reinforcement are cut and bent this table is used as a reference to bend the reinforcement bars in desired and required shape and sizes.

What information a bar bending schedule has?

Bar Bending Schedule is expected to contain all the important information and summarizes in tabular form. A good bar bending schedule must contain the following information :-

1. Bar Mark No.
2. Cut Length
3. No. of Pieces
4. Bar Cut Shape
5. Bar Diameter

To know more about each of the above information, how to calculate and what it should be please follow this link

What Information A Bar Bending Schedule Should Contain.?


Therefore now we are able to prepare a Template of a bar bending schedule; a typical bar bending schedule would be like this :-


A Typical Bar Bending Schedule Table

Now from here you might be asking one question that what actually is the need of this tedious job of preparing Bar Bending Schedule.

What is the need of Bar Bending Schedule?

The simplest answer for this question would be that money matters a lot and reinforcement bars, in any project, takes a healthy share of the financial term of the project. Therefore in order to purchase material we need an estimate which should be near-to-actual during execution, this estimate may differs from engineer estimate which is only on the basis of experience and is only taking construction or bidding tender drawings as reference which are general and typical.

Thus with the help of Bar Bending Schedule you would have a clear figure about how much reinforcement you need to purchase of various diameters. After purchase the reinforcement the next phase is to cut and bend.

This cutting and bending must follow the bar shape shown in the bar bending schedule, thus before execution bar bending schedule is a must-to-have document at site. It is a good working technique because we cannot bear any error or mistake during this cutting and bending which otherwise will cause financial problems for all concerned.

The next phase after project execution is witness of the quantity by engineer at site as per drawings and verification of this quantity for further payment and financial steps. Engineer during steel fixing check the rebar as per the shop drawing and ensure it matches the bar bending schedule duly approved by the quantity and measurement engineer.

Thus for the payment of the contractor by client this document is also needed.
The contractor actually submits a document called Quantity Witness Report (QWR) to the engineer having attached all the documents required like, reinforcement approved inspection requests, approved structural shop drawings, approved bar bending schedules. This is then verified by the engineer.

What are the qualities of a good bar bending schedule?

It is always ensured that the person preparing the bar bending schedule must have a solid site execution experience. The rebar designation and cut length must be carefully selected as it will be the defining point for the scrap which will be remained after cutting and bending


Read More
  • Share This:  
  •  Facebook
  •  Twitter
  •  Google+
  •  Stumble
  •  Digg

What Information A Bar Bending Schedule Should Contain.?

 Er.Ahmad Monis Ansari     February 24, 2018     Quantity Survey     3 comments   

Bar Bending Schedule or BBS is actually a detailed tabulated worksheet showing the particulars of reinforcing bars as needed in reinforcement drawings of a structure. The phrase “Bar Bending” is so because at the steel yard where different types of reinforcement are cut and bent this table is used as a reference to bend the reinforcement bars in desired and required shape and sizes.


Bar Bending Schedule summarizes and should contain the following information :-

1. Bar Mark No.

In Contractual practice of construction projects, the designed made by consultants termed as the Engineers are issued as Construction Drawings by a covering letter termed as Drawing Transmittal Slip (DTS). These construction drawings are typical drawings only showing the criteria of design and requirement as per the standards of design and detailing.

Keeping in view of these construction drawings, contractor prepares his own shop drawings showing detailed sketches and sections as needed by the structure and as desired by the engineer. These shop drawings are submitted for review and approval of engineer which must be approved prior to the execution of work at site.

The structural drawings showing reinforcement in construction drawing only annotate the diameter and spacing along with orientation and occasionally quantity but not too often.

The structural shop drawings on the other hand show the quantity, orientation, Bar designation also known as Bar Mark No. or Bar Annotation No. It is a unique designation of the reinforcement bar which is noted at the end in Bar Bending Schedule.

The two reinforcing bars must be given different designation no. if the bar length is changing or if the bar shape is changing.

2. Cut Length

It is the nominal length as per the requirement of the structure and construction drawing, usually noted in mm. The cut length may or may not contain the bending length which is the extra length needed to bend a large diameter rebar at angle of 30, 45 or 90 depending on requirement. If the bending length is contained in it than during verification of this BBS by consultant they prepare bend deduction sheet and will deduct the bend as it is not payable in most of the circumstances.

3. No. of Pieces

Bar Bending schedule also provide the quantity and number of pieces of each designated bar. It is calculated by dividing the space / structural dimensions by the spacing as required by the design. For example if the length / span of beam is 6000 mm and it has shear ties at spacing of 300 mm center to center i.e. c/c than the quantity or no. of pieces would be 6000 / 300 = 20 nos.

4. Bar Cut Shape

It is the most important column in the Bar bending schedule as far as the bending and cutting of reinforcement is concerned at site. Each bar no. can have different shape depending on the shape of the structure to be reinforced. Thus the bar may have a hook or a bend in any angle which must be properly mentioned. If the bar is provided with a curve than a clear figure showing radius of curvature must be given. Similarly if the reinforcing bar is confined in a sloping portion and the bar is required to have a varying length than a delta is calculated showing the unit increment or decrement of rebar length and must be shown in the bar bending schedule (will be explained later on).

5. Bar Diameter

Each bar No. is shown with a diameter of rebar usually in mega projects the diameter used is of #4, #6, #8 or #10 & #11. Small diameter rebar is used in construction joints or as temperature reinforcement and larger diameter bars are main reinforcement bars.

Each Bar Diameter have a nominal corresponding unit weight which is used at the end of the bar bending schedule showing the weight of each category of bar diameter.

Table showing Each Bar Diameter corresponding to No. and Nominal Unit Weight


Read More
  • Share This:  
  •  Facebook
  •  Twitter
  •  Google+
  •  Stumble
  •  Digg

Thursday, 22 February 2018

Landings in Stairs – Purpose, Location and Standard Dimensions

 Er.Ahmad Monis Ansari     February 22, 2018     Quantity Survey     2 comments   

What is a Stair Landing?

Landings in a stair is a level floor or platform constructed at a location where the direction of stairs changes, between flights of the stair, or at the top of stair flight.
The locations of landings in a stair is shown in Figure 1, Figure 2 and Figure 3.

Fig.1: Landing is provided between flights of a stair
Fig.2: Stair landing at the top between and bottom of stair flights

Fig.3: Landing is provided when the direction of stair changes


What is the Purpose of Stair Landing?

  •  Stair landing is provided to permits stairs to change directions, Figure 4.
  •  Another purpose of stair landing provision is to allow occupants to rest.
Fig.4: Landing provided to allow stairway to change its direction


What are the cases in which stair landings are needed?

  •  Stair landing should be provided at the top and bottom of each flight of exterior and interior stairs.
  •  Stair landing is needed where a doorway at the top of stair flight swings toward the stair, Figure 5 and Figure 6.
Fig.5: Doorway swing on landing of stairway

Fig.6: Doorway opens on toward the stairway


  •  For stairways with straight run that have an overall rise greater than 3.65m, an intermediate landing should be provided.

What the cases in which stair landing can be omitted?

  •  If a doorway that located at the top of a stair in a dwelling unit is swing away from the stair, then landing is not required between the stair and the door.
  •  It is possible to omit landing at the top of a stair serving a secondary entrance to a single dwelling unit provided that the stair does not have more than three rises and the door is sliding or swing away from the stair.
  •  Landing stair can be neglected at the bottom of an exterior stair provided that there are no obstruction within a lesser of stair width or 900mm for stair serving single unit and 1100mm for stair not serving a single dwelling unit.

What are the standard dimensions of stair landing?


 The width of landing should not be smaller than the width of stairway they serve as illustrated in Figure 7.
Fig.7: Width of landing determined based on the stairway they serve

  •  The dimension of landing in the direction of travelling should be at least equal to the width of the stair and it should not surpass 1219mm where the stairway is a straight run.
  •  When a door is opened on the landing, it should not reduce the landing smaller than half of required width. Added to that, when the door is opened completely, it should not project greater than 178mm on the landing.
  •  If wheelchair spaces are required on stairway landing, it should not be located with the required dimension of the landing and doors must not swing over the wheelchair space.
Read More
  • Share This:  
  •  Facebook
  •  Twitter
  •  Google+
  •  Stumble
  •  Digg
Newer Posts Older Posts Home

For Lates Updates By Email

Enter your email address:

Delivered by FeedBurner

Popular Posts

  • CIVIL ENGINEERING LATEST INTERVIEW QUESTIONS AND ANSWERS PART-I
    Q) How do you calculate Bearing capacity of soil? A) Firstly, it depends on the soil type and type of the project. Calculation of bearin...
  • Bar Bending Schedule for Reinforced Concrete Beam
    Bar bending schedule provides the reinforcement calculation for reinforced concrete beam. It provides details of reinforcement cutting leng...
  • Important AutoCAD Command and Shortcut One Must Know
    In this massive list of approximately 100 AutoCAD commands, I have tried to include some of the most useful commands, Keyboard Shortcuts an...
  • What Is A Bar Bending Schedule
    Bar Bending Schedule or BBS is actually a detailed tabulated worksheet showing the particulars of reinforcing bars as needed in reinforceme...
  • What Information A Bar Bending Schedule Should Contain.?
    Bar Bending Schedule or BBS is actually a detailed tabulated worksheet showing the particulars of reinforcing bars as needed in reinforceme...
  • Types of Fixtures and Fastenings for Doors and Windows
    Fixtures and fastenings are provided for doors and windows to provide operating facilities, security for rooms and ease of opening and clos...
  • Beginning With Concrete Technology
    C ement,mortar and concrete are the most widely used construction materials.It is difficult to find out another material of constructio...
  • General Important conversion a Civil Engineer should know
    A s we all know that basic of Civil Engineering is all related to measurement and calculations. In this article I will discuss some use...
  • Basic points to be kept in mind while designing of coloumn
    The basic rules for designing of columns are listed below:                                A. LONGITUDINAL STEEL: 1. The cross-sectional...
  • Polymer Concrete A New Revolution In Concrete Technology
    If in 2018 you are not familiar with this highly durable and beneficial construction material than you must read each an every word of this...

Translate

Pages

  • Home
  • Civil Engineering
  • About Us
  • Contact Us

Blog Archive

Report Abuse

Search This Blog

About Me

My photo
Er.Ahmad Monis Ansari
View my complete profile

Copyright © CIVIL LEARNERS | Powered by Blogger
Design by Hardeep Asrani | Blogger Theme by NewBloggerThemes.com | Distributed By Gooyaabi Templates